I ground down the casting seams and defects, filed, wire brushed, then sanded before shooting a primer coat of machine gray. My plan is a two tone paint job in turquoise and off white.
Monday, February 22, 2016
Restoring an old Superior buffer/grinder head part1
No idea of the age but it's in good condition. Marked Superior, Made in USA. If anyone has information about these I'd love to know.


I ground down the casting seams and defects, filed, wire brushed, then sanded before shooting a primer coat of machine gray. My plan is a two tone paint job in turquoise and off white.
Friday, December 4, 2015
Experiments with acoustic horns as mobile device amplifiers
Before jumping in I have to make it clear that horns are not amplifiers. If I don't, I'll get a bunch of messages enlightening me. But horns do make sound louder and when paired with cell phones are commonly called "passive amps", and even though that is a misnomer what else should we call them? "Phone horn" doesn't have a nice ring. "Impedance matching device for mobile audio electronics" sounds like the title of a patent application. What's the big deal and what's the difference between an amplifier and a horn? An amplifier adds energy to the system, it makes the speaker vibrate harder, moving more air, and increases sound output. Horns are different, they make speakers louder by making transfer from the relatively dense speaker to the relatively rare atmosphere more efficient. Sound travels easier through dense substances like water and less easy through gasses like air. The horn helps the sound energy transfer from one to the other and the result is louder music. If you'd like to hear a smart person explain it, click HERE.
My first ever "horn" was a piece of PVC pipe with a slot in the middle for my phone and the ends cut at an angle toward the listener. It sat on two feet to prevent it from rolling around. It worked "okay". I don't own it anymore and can't find a picture but you may have seen similar speaker stands, maybe with bamboo.
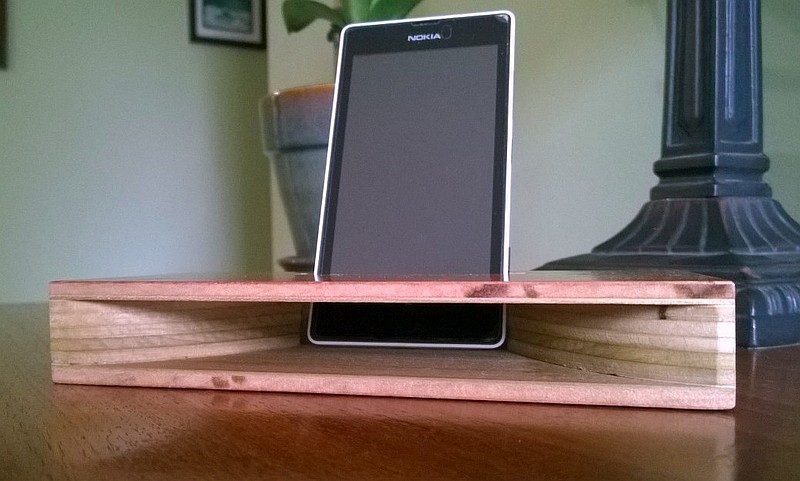
My second (and real) horn which I'm calling 1.0 is based on a design by Dustin Penner. What Dustin brought to the table is a easy to make flat horn from 3 pieces of wood. I made it smaller and changed the curves slightly but overall the result is impressive.
My first ever "horn" was a piece of PVC pipe with a slot in the middle for my phone and the ends cut at an angle toward the listener. It sat on two feet to prevent it from rolling around. It worked "okay". I don't own it anymore and can't find a picture but you may have seen similar speaker stands, maybe with bamboo.
My second (and real) horn which I'm calling 1.0 is based on a design by Dustin Penner. What Dustin brought to the table is a easy to make flat horn from 3 pieces of wood. I made it smaller and changed the curves slightly but overall the result is impressive.
![]() |
| Horn 1.0 |
![]() |
| Horn 1.0. Height is approximately 1 inch (25.4mm). It was made in 3 layers. |
Horn 2.0 is based on a folded horn design by MXX on Instructables. This style of horn is usually seen on bass heavy concert speakers and definitely has a warmer but slightly muddier, sound. The downside is this speaker is much more difficult to build than Penner's.
![]() |
| Horn 2.0 |
Horn 3.0 is a folded version of v. 1.0. If you are unfamiliar with folded horns, just imagine a trumpet with all it's turns. A horn doesn't need to be straight. 3.0 is much louder than the two previous versions. In my test, it was 12-14 decibels louder than the previous horn designs but the sound is also a bit harsh. To me it sounds like the small transistor radios that were popular in the 60's and 70's.
![]() |
| Horn 3.0, made in 5 layers and is approximately 1-7/8" tall (47.63mm) |
Saturday, November 21, 2015
Walnut Trestle Sewing Table
Inspired by an 1840-ish Shaker table originally made in Harvard. I redrew this full scale from a sketch in Shea's "Making Authentic Shaker Furniture" and created full size patterns for the feet and legs. The leg tenons extend all the way through the feet. The feet each have half a mortise which makes construction much simpler. The feet join together and are pinned to the leg. The leg, stretcher, and battens all interlock. The top is attached with screws in elongated slots.Sunday, November 1, 2015
Refurbishing a Delta Homecraft Lathe Headstock
I recently purchased just the headstock for a Delta Homecraft Lathe. Delta sold different models of lathes with this same or very similar headstock from the early 30's until the mid-50's so I don't know when specifically this headstock was sold.
![]() |
| Before and After |
I stripped the headstock down completely, cleaned and looked at every part. The Timken tapered roller bearings (1) & (2) are in excellent condition and did not need replacement. The spindle threads had some minor damage which I repaired with a needle file.
Unfortunately the indexing pin point was damaged sometime in the past but is still usable.
Since I was down to bare metal I filed the casting seams fairly smooth
And repainted with Rustoleum Dark Machine Grey.
One little mishap during the process, the badge was damaged.
Now what to do with it? My original plan was to make a bowl lathe / disc sander. I might still do that or might end up reselling it.
Saturday, October 17, 2015
Nova G3 vs. Nova Precision Midi lathe chucks
I've been using a Nova Midi chuck but wanted an upgrade. So when I spied an open box G3 on Amazon Warehouse with 2 sets of jaws for $124 shipped, I bit. The G3 was supposed to be direct threaded for 1x8 threads but instead mine was threaded for 1-1/4x8. No problem, I ring Amazon on the blower (opened a chat with customer service) and told them I would keep it if they gave me credit to buy the proper insert. No problem says Amazon and within 2 days my insert had arrived.
The Midi was purchased used and came with 2" and 1" jaws, a woodworm screw, allen keys, and tommy bars for around $50; not a bad deal. The G3 also came with 2" and 1" jaws, a woodworm screw, allen keys, and the wrench doohickey; for a little less than $124. My lathe is still not 100% operational so I haven't turned with the G3 yet so this is not a proper review although I don't believe a review is really necessary. [Update: I have used the G3 a good bit and it performs equal to the Midi although I prefer it since I can scroll the jaws one handed.] The G3 is among the most popular lathe chucks sold and Teknatool makes high quality chucks. What I am doing is comparing size and heft of the two chucks since the G3 looks considerably bigger so you'd expect it to be beefier, but is it?
So in about every way, the G3 dwarfs the Midi so you'd expect it to be a heavier duty chuck. But as you can see in the pictures above, the G3 is mostly hollow. Placed on the scale, the G3 weighs in at 55 oz., or 1.56 kg.; the Midi weighs 53 oz. or 1.50 kg. The 2 oz. difference is the G3 has a threaded insert, the Midi is direct threaded for 1x8. They are essentially the same weight.
One advantage the Midi has over the G3, and it's pretty significant to owners of gap bed lathes, is that being shorter it allows more room for turning platters. The G3 is so long it renders the gap on my Delta 46-111 useless. Of course the main advantage of the G3 and why I wanted to upgrade was that you can open or close the jaws one handed while using the other hand to steady the wood blank or bowl. The Midi chuck requires 3 hands unless your lathe comes with a spindle lock. So was the G3 really an upgrade? It's sounding less and less so, but the G3 also has set screws on the spindle threads so it can be reversed. The Midi has no set screws and if you reversed the lathe it would spin itself right off the spindle.
Amazon affiliate links:


![]() |
| G3 (left) and Precision Midi (right) |
![]() |
| G3 (left) and Precision Midi (right) |
So in about every way, the G3 dwarfs the Midi so you'd expect it to be a heavier duty chuck. But as you can see in the pictures above, the G3 is mostly hollow. Placed on the scale, the G3 weighs in at 55 oz., or 1.56 kg.; the Midi weighs 53 oz. or 1.50 kg. The 2 oz. difference is the G3 has a threaded insert, the Midi is direct threaded for 1x8. They are essentially the same weight.
![]() |
| Precision Midi |
![]() |
| Nova G3 |
Amazon affiliate links:
Wednesday, October 14, 2015
Simple Carpenter Bee Trap
My shop has been infested with carpenter bees this year and recently I learned how to make a simple trap. Carpenter bees, or wood bees, like to find little crevices and holes in which they nest. My trap is a simple 2x4 cut off with 1/2" holes drilled to a central chamber that leads to a glass jar. Hopefully the bees will be lured into the wood then crawl toward the light and become trapped. We shall see. I'll post an update in a few weeks whether the trap worked or not.
Tuesday, September 29, 2015
Rockwell Delta 46-111 Lathe, Part 4: Remote Control Pendent
A long overdue update. The lathe has been repainted, reassembled, the variable speed motor installed, and I've began working on a remote control pendant like those found on Robust or Vicmarc lathes.
Treadmill motors have a soft start feature so the treadmill must always start at the slowest possible speed, a good safety feature in a treadmill but not desirable in a lathe. Reportedly you can bypass the softstart feature on an mc-60 controller (most common type) by switching the wiper on the potentiometer. Unfortunately I am not using an mc-60 controller and switching any of the potentiometer wires individually does not stop the motor. As time goes on I will experiment with switching multiple wires at once and report back. As it sits now, the speed control works just fine but the little on/off switch does diddly squat. There is a main power switch on the lathe stand for cutting power to everything.
![]() |
| current status of the remote |
Treadmill motors have a soft start feature so the treadmill must always start at the slowest possible speed, a good safety feature in a treadmill but not desirable in a lathe. Reportedly you can bypass the softstart feature on an mc-60 controller (most common type) by switching the wiper on the potentiometer. Unfortunately I am not using an mc-60 controller and switching any of the potentiometer wires individually does not stop the motor. As time goes on I will experiment with switching multiple wires at once and report back. As it sits now, the speed control works just fine but the little on/off switch does diddly squat. There is a main power switch on the lathe stand for cutting power to everything.
![]() |
| GE PWM speed controller |
![]() |
| Dell powerbrick repurposed as a remote control |
![]() | ||||||
| Switching the center wire to stop/start the motor, an idea that did not work. |
![]() |
| Non functioning power toggle and perfectly functioning potentiometer. |
Subscribe to:
Posts (Atom)