Saturday, December 27, 2014

Dinky Turned Box

While waiting for glue to dry on another project I was looking for something to do. Found a little nub from a previous turning and made a small box. 2 inch diameter, 1-1/4 inches tall.


Sunday, December 21, 2014

Wooden coffee cup experiment

A wood coffee cup has been on my agenda for awhile so decided to do an experiment. This sample cup was turned from silver maple and unfortunately cracked while turning. The cracks were sealed with super glue inside and out. Then the cup was finished with three coats of brushed on lacquer. I was afraid the cracks might come back to haunt me and they did. After only a couple hours holding tap water, the lacquer failed and the wood swelled and burst along the crack lines. If anyone has successfully made coffee cups from wood, some advice is appreciated. Next time I might try some epoxy.


Tuesday, December 16, 2014

Stanley 501A Try Square, a vintage tool review + Before and After

These ugly try squares were a bargain price I couldn't refuse, less than $2 each. I didn't buy them as show pieces but to scatter around the shop so I would have a square handy where needed.
Before
 The order is reversed in the bottom pic. Middle is still middle but top and bottom squares are reversed. (Reminds me of this Johnny Cash song)
After

The Bad:

  • Numbers have no contrast and are tough to read.
  • Handles are plastic and balance is poor, they are blade heavy.
  • Blades are stamped steel.

The Good:

  • They are dead nuts square, at least to my ability to measure. I compared them against a machinist square and did the 'ol draw a line and flip test - square. 
  • They are fairly durable as you will read below. These took some abuse and stayed square.
  • Made in U.S.A.


A previous owner had spilled some kind of glue all over the blades and left it. Rust formed under the glue but luckily was only on the surface. A quick scraping, a vigorous brushing for good measure and they were clean and rust free although stained. They had been dropped numerous times and all the metal corners were bent but a file put it right in a jiffy. The previous owner also painted the handles green, probably to identify them at a glance. Through all that abuse the squares stayed true so I have to give my nod of approval.

Thursday, December 11, 2014

Turning an ipe and maple mallet

Final weight: 17 oz. 
Woods are ipe & maple


The handle is 2 pieces of 4/4 maple about 2×12 inches. The head is 4 pieces of 4/4 reclaimed ipe about 2.5×7 inches.

Getting the ipe flat without a jointer was trial and error. Hand planes dull after a few strokes and I didn't want to risk my planer knives, so it was a matter of using the table saw and skimming a little at a time until the pieces were reasonably flat. “Reasonably” meant a little more clamping pressure than usual but at least with ipe you don’t have to worry about leaving marks, it doesn't dent. Not that leaving marks would have mattered since they would be turned away.


Corners were knocked off on the table saw. The band saw would have been my first choice but mine only has a carbon steel blade and ipe can damage carbon steel.

I forget to take pictures so we jump from mounted on the lathe to pretty much done.


I only have carbon steel (cs) and carbide tools (note to self: really need to get some HSS), so it was carbide on the head and c.s. on the maple. The ipe machined nicely but carbide tends to cause more tear out than steel so I had a good bit of sanding. Ipe is merely amused by sandpaper so I got the head fairly smooth but not perfect.
Tried burning a lines in the end grain but it wasn't happening.

Finished with blonde shellac. Normally I prefer oil only on tool handles, especially hammers/mallets, but wanted to keep the maple a neutral color. 

The lines were burned with a piece of Formica which produces a cleaner line than wire. 


Formica samples like these can be found in most home improvement stores.


I would change one thing, make the head larger. My goal was to hit about 21 oz. but got too aggressive on lathe and ended up at 17 oz. Still, it's a fine mallet.


Sunday, December 7, 2014

Twelve-in-One Combination Tool, a vintage tool review.

Thought it might be fun to review vintage tools that are still commonly available. First up we have the Twelve-in-One patented in 1927 by Thomas Setzer Hutchison, a very interesting man in his own right but we will get to that later.


The Twelve in One combination tool is made of German silver, is approximately 12" long when fully extended, and was advertised to perform the following functions:
1934 Advertisement

  1. 12" Ruler
  2. T-square
  3. Bevel gauge
  4. Depth gauge
  5. Try square
  6. Marking gauge
  7. Inside measure
  8. Compass
  9. 30° angle
  10. 45° angle
  11. 60° angle
  12. Adjustable extension ruler


Does it? Well yes although some of the functions overlap. Hutchison's invention has two sets of grooves so that mating rulers can be locked at 90°, in the middle as a t-square or on the end as a try square. I measured these angles with an engineer square and also with the line drawing technique and found them dead nuts square. Setting the gauge for 30/45/60 degrees involves aligning one arm to lines scribed in the other, this is less precise than grooves but when checked against drafting triangles I found the markings to be accurate.

Is the Twelve in One tool worth owning? Yes. It is a lightweight, very compact tool that fits nicely in your pocket. The angles are accurate and it performs all its functions well considering it is simply two pieces of metal and a thumbscrew.  I use it most often as a depth gauge, square, and bevel gauge; in that order. The lines are a little hard to see on mine for use as a ruler but it's passable in a pinch. I've yet to use it as a compass because I always forget but it does work well as a marking gauge. The thumbscrew is easier to tighten than loosen, whether that is a benefit or detriment I'll leave to the individual. I wouldn't mind if the thumbscrew were just a tad taller, maybe 1/32". These can be found on ebay under various titles. Many sellers have no idea what they are and may be listed as combination tools, 12 in 1, twelve in one, Nashville tool, dozen tools in one, and other variations. At least one other company manufactured them, a CWS Co. based in Chicago.

About Thomas Hutchison, he was a lifelong soldier who rose through the enlisted ranks and eventually commissioned as an officer. He served with distinction in the Spanish American War and retired a captain. After the war he served as police commissioner fighting for reforms in animal cruelty and child care. Apparently life in Nashville was too tame and he volunteered for the Greek Army and fought in the First Balkan War. After finally retiring he invented this combination tool. Hutchison died in 1936.


Thursday, December 4, 2014

Turning a shallow bowl

Turned from recycled ipe.

Ipe Bowl
A glue block cut with a hole saw 
Removing the corners. Clamping a speed square was quicker than swinging the saw to 45 degrees.

Mounted to my Nova Midi chuck.

Roughed out.
Sheesh, this stuff is hard but I used carbides mostly because ipe dulls tools quickly.

Bead cut around the edge and a recess for the chuck jaws in the bottom.

The face hollowed.

Side shot.

Full frontal.

Color is yellowish in this shot but I like the busy background.

Finished with linseed oil and wax.


Sunday, November 30, 2014

Tote? Toat? Handle? That wooden thing on the back of a plane.

Why is the handle of a plane called a tote?

I got curious and found this 1883 reference in The Imperial dictionary, on the basis of Webster’s English dictionary, Volume 3; by John Ogilvie.

  • Toat: A joiner’s name for the handle of a plane.

Knight’s American mechanical dictionary, 1882.

  • The bottom of the stock is the sole. The toat is the handle.

Toat is an English variation of tote.

Joseph Moxon used the term “tote” and if you look at the illustrations in Mechanic Exercises (1678), the plane totes look like carrying handles.


Roubo’s planes also had carry handles.


So by my reckoning, they were called totes because they were used for toting around hand planes. I supposed that's equally true of today's planes although that wooden (or plastic) thing on the back looks more like a handle than a tote but who am I to argue with history. 
What do you think toats, totes, or handles?

Friday, November 28, 2014

Before and After Stanley 220 Block Plane

This block plane looked worse than it was. First degreased with a citrus based cleaner, rinsed, then de-rusted. The sole was flattened and the sides were sorta flattened. The blade appeared to be brand new under the rust and corrosion and still had the factory edge. It was fairly flat too. Will make a nice user plane. Most of the body Japanning is intact but the lever cap heel is bare.


After cleaning, before flattening.

Thursday, November 27, 2014

Before and After Cedarberg Mfg Co., Dandee Reel chalk line

This 1940's chalk line by Cedarberg was in bad condition. Three applications of Naval Jelly and a wire brush brought it back from rust-purgatory. It now works a dandy. 


Before


After


Tuesday, November 25, 2014

Woodwork Visualized: shop class in a book. [book review]

Woodwork Visualized by Ross Cramlet is a book of illustrations detailing everything you should have, could have, or did, learn about woodworking in your high school industrial arts program with a focus on hand tool woodworking.

[TLDR version: fledgling woodworkers should get a copy of this book or read it online for free.]


Ever wanted to predict which way a stick of lumber will warp? Curious why heartwood is more stable than sapwood? Cramlet crams much useful information about how trees grow, why and how lumber warps, how timber is cut into boards, how to measure board feet, and tips on selecting the strongest wood for handles (use fast grown, straight grain, wood); all in just four pages packed with pictures.


The bulk of the book is about tools and how to use them. Sounds stale because every woodworking 101 book has a section explaining that circular saws are saws that go in a circle. But you won't find power tools in Woodwork Visualized, it's about human power. The real difference is Cramlet teaches you how the tools are used as he introduces them. Some of the basics are very basic, like how to read a ruler. But there are plenty of wise nuggets like how to set your bevel square to 30, 45, or 60 degrees without a protractor. And much more like:

  • How to lay out common shapes with a compass. 
  • Transferring designs with graph paper. 
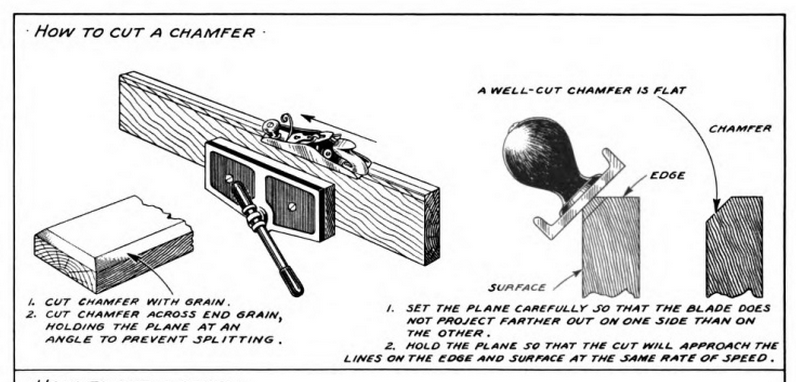
  • Setting up, tuning, and using hand planes.
  • Basic chisel cuts.
  • Filing. Rasping. Shaping. Sawing.
  • Several sections on wood joinery, marking, cutting, and fastening.
  • Sharpening. You know we woodworkers like to obsess about that.
  • And basic finishing.


There are a few projects at the end. Beginning with a simple box and working up to a saw bench, wall cabinet, workbench, tool box, and basic furniture. Projects may vary by edition.

I own the Second Edition ©1974. The online edition is ©1950. The Second Edition has 178 pages, 20 more than the online edition. There are minor differences in page order and projects shown. Pages above are from the 1950 edition.

Sunday, November 23, 2014

Variable speed lathe using a DC treadmill motor

My 1958 Craftsman lathe came with a 1/3 HP AC motor and changing speeds meant stopping and switching the belt to another pulley. Blech! A little research yielded a cheap solution -- a treadmill motor. Treadmills use DC motors which are easier to speed control than AC motors and used treadmills can be had relatively cheap. Components to the system are the DC motor, motor controller (PWM), potentiometer (pot), switch, fuse, and usually a choke (transformer).

Wiring is simple as seen in this schematic.


The motor controller converts AC power to DC, the choke smooths the power and gives the motor better performance. The potentiometer is an ordinary linear taper from Radio Shack. The most common controller is the MC-60. I believe all controllers are adjustable for high and low speed but I found no need, the default settings were fine.


Control panel that houses the controller, switch, and pot.
The switch plate is a bit garish but fun.

I designed a speed chart to go around the potentiometer. To see how I determined speeds, see my post on a shop made strobe tachometer.


Pictures of my DC motors and controllers.

1 HP DC motor
motor controller
Back of potentiometer 
MC-60 controller

1.5/2.5 HP DC motor
Your motor should come with a heavy flywheel to improve torque.

And on the lathes. First pic has messy wiring, later I made it tidy.


Same motor on my Goodell Pratt lathe.