Tuesday, September 29, 2015

Rockwell Delta 46-111 Lathe, Part 4: Remote Control Pendent

A long overdue update. The lathe has been repainted, reassembled, the variable speed motor installed, and I've began working on a remote control pendant like those found on Robust or Vicmarc lathes.

current status of the remote


Treadmill motors have a soft start feature so the treadmill must always start at the slowest possible speed, a good safety feature in a treadmill but not desirable in a lathe. Reportedly you can bypass the softstart feature on an mc-60 controller (most common type) by switching the wiper on the potentiometer. Unfortunately I am not using an mc-60 controller and switching any of the potentiometer wires individually does not stop the motor. As time goes on I will experiment with switching multiple wires at once and report back. As it sits now, the speed control works just fine but the little on/off switch does diddly squat. There is a main power switch on the lathe stand for cutting power to everything.

GE PWM speed controller

Dell powerbrick repurposed as a remote control

Switching the center wire to stop/start the motor, an idea that did not work.


Non functioning power toggle and perfectly functioning potentiometer.


Sunday, September 6, 2015

Making a saw blade knife

Saw blade knife with padauk handle.
I made this knife from a circular saw blade. There is an internet myth that claims circular saw blades are made from low carbon or mild steel, or just junk steel, nothing could be further from the truth. Saw blades spin at over 3,500 rotations per minute and endure significant stress while cutting wood, the steel must be high quality and very tough. Unfortunately blade makers are not very forth coming with what steel they use and the resulting speculation breeds all sorts of rumor. Many people believe these blades are made of L6, a common tool steel known for it's toughness and impact resistance. A few have sent blades for metallurgical analysis and the results confirm an alloy that is very similar to L6. Still there are a number of people who for whatever reason insist these blades are garbage steel. I'm not a metallurgist and can't say what steel is in any particular saw blade but neither can anyone else who isn't the manufacturer of that blade. What I can say is that many people have made knives from circular saw blades and in testing those knives are very tough and hold an edge well. If you need a disclaimer, here it is: cheap things are cheaply made. I believe that if you use a good quality blade from a respected manufacturer then you're likely to get good steel but this is recycling, there are no guarantees.

Step one was cutting the rough shape from an old Delta saw blade using a 10" cut off wheel in a chop saw. This steel is hardened and cuts very slowly. It is so hard near the tips where the carbide is brazed that I had to break it, even the cut off wheel wouldn't cut it. Usually you will see knives made from annealed (softened) steel which is later hardened then tempered. Since this steel is already hardened and I do not have proper heat treat equipment, I chose to keep the factory heat treat and just be careful to keep the blade cool while cutting and grinding; that meant lots of stopping and waiting.
 

The handle material is padauk, a South American hardwood often used for xylophone keys. It is hard and somewhat oily. The red will "bleed" out when the wood is wetted, especially with any kind of solvent. Normally the handle would be attached with pins but this steel is too hard to drill with normal drill bits so I have to rely on epoxy.

The handle scales clamped while the epoxy hardens.

The handle was shaped with disc and spindle sanders, then hand sanded with 120, 150, 220, 320, & 400 grit sandpaper. Sorry, no pics of the sanding.

The finish is shellac and wax. Not an especially good choice for a knife but the padauk is tough wood and would be fine without a finish but the shellac stops the red from bleeding.

Top down shot of the handle.

No trouble with a Roma, fresh from the garden.

See through radishes!


Wednesday, June 24, 2015

Grumman SP145 - Part 2: Choosing new floor material

I researched a lot of options for new floor material which I will list along with pros and cons and maybe this will be of interest to someone facing the same decision.

When dealing with aluminum boats you should beware galvanic reactions which can occur with dissimilar metals + an electrolyte. Examples would be steel screws into aluminum + salt water, or pressure treated wood (copper + salt) against aluminum.

Plywood - The original manufacturer used plywood, stainless steel screws and carpet. Occasional moisture or splashes will not hurt the plywood but my boat lives outside. Carpet would only make things worse by trapping moisture.

Painted Plywood - Painting is a good option, looks pretty good and lasts for years. The painted plywood the previous owner used held up for over six years with no sign of deterioration.

Epoxy over plywood - A excellent option that is expensive and time consuming but very long lasting.

Pressure treated plywood or decking - Pressure treated wood in contact with aluminum will cause galvanic corrosion because of the copper and salts used to treat the wood. The best advice is to allow the wood to dry well, preferably for some months, before installing. This is because pressure treated lumber has fairly high moisture content when you buy it and that additional moisture will only accelerate the galvanic corrosion. On top of that, you either have to seal the plywood or seal the aluminum so they can never come into contact.

There are new treated plywoods rated for aluminum contact but if you read the fine print that is only under dry conditions. They still contain copper and salts and will cause galvanic corrosion if they get wet.

Marine grade plywood is just pressure treated plywood that costs twice as much. There are other options such as MDO which is very heavy and very expensive.

Composite decking - Seems like an ideal floor material as it doesn't corrode aluminum and often comes with 15-20 year warranty. But it's also very heavy, gets very hot in direct sun, expands and contracts more than wood, and is relatively expensive.

Cedar/redwood/cypress or other rot resistant wood - Unfortunately the same oils that provide rot resistance also tend to corrode aluminum. But the plus side is that nothing beats real wood in appearance.

There are serious pros and cons to every flooring option. In the end I chose Eastern red cedar because it's extremely rot resistant, beautiful, plentiful and inexpensive in my area. I tried to use nothing but red heartwood (white sapwood is not rot resistant). A shot of spray paint over the aluminum will hopefully be enough to prevent corrosion. For fasteners I stuck with stainless steel. I figure if the manufacturer chose stainless who am I to second guess them.

Freshly planed ERC. I wish it stayed this color.


Monday, June 22, 2015

Grumman SP145 - Part 1: Nasty old floor

My aluminum boat is in dire need of a new floor. The original floor was carpeted plywood which the previous owner covered with painted plywood. The painted ply held up well but the original floor was turning to dust so it all needed to come out.


The above pic is after I removed the painted plywood, what you see is the original carpeted floor or what remains of it.


The hull bracing and bait well were fastened with aluminum blind rivets so removal was just a matter of drilling out the center and punching them through.


Clean and ready for a new floor. 


Thursday, May 7, 2015

Swing Arm Task Lamp

Swing Arm Lamp

Months back I made this articulated arm lamp but the arms were too narrow and didn't develop enough friction to hold the lamp without drooping over time.


I made this swing arm lamp as an improvement. It reuses parts of the original hinge with a longer central pivot.


The bottom arm has a dowel that engages one of three notches in the upper arm. The notches are only about 3/8" apart but allow approximately 20" vertical movement.


Lowest position
Middle position
High position
When swung left it lights up my drill press table. When swung right it sets above my lathe's headstock.


Here is a free plan. You will need to adapt it to whatever lamp you have. 


Friday, May 1, 2015

Rockwell Delta 46-111 Lathe, Part 3: Variable Speed

This will be my 2nd lathe converted to variable speed.
[edit; for some reason Blogger deleted the photos so I have edited this blog with updated info and pics.]

This is the lathe, a Rockwell 46-111, circa 1974. Which I have finished repainting. You can read more about the lathe in previous blog posts.


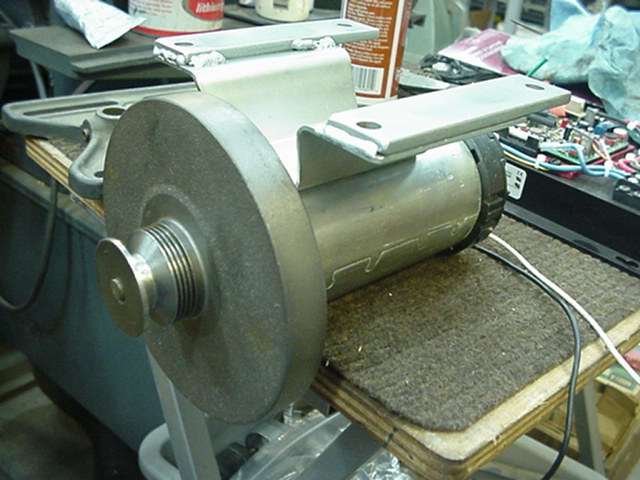
This is the motor: 1hp at 90 VDC. Big improvement over the 1/2hp original motor. It's from a popular brand of treadmill. Originally it had a digital control panel and extra boards but I eliminated all that and attached a 5k linear taper potentiometer from Radio Shack. The treadmill cost me $30. I listed the control panel on ebay and it sold within hours for $35, plus $25 for the scrap metal and I came out ahead.


Two things left to do.
[edit; I switched to a motor with a V pulley so everything from here down was unnecessary.]
  1. Make a new motor mount or modify the original. Shouldn't be difficult.
  2. The DC motor has a flat pulley but the lathe has V pulleys.


The most common solution is removing the flywheel and attaching a V pulley. I could do that but then I lose the torque benefit of the flywheel and extra torque is always welcome on a lathe. 

This chap had a great solution. Unfortunately I do not have a metal lathe and at 1-1/8" dia the flat pulley on mine is too small to accommodate a V belt. 


So I'm thinking I will make a 2nd pulley that will slide over the flat pulley. A 2" pulley would put me in the range of 3500 RPM at the spindle. I'll soon let you know how well it works.

Wednesday, April 29, 2015

Rockwell Delta 46-111 Lathe, Part 2: Paint

Indexing pin and tail stock levers that originally were bare metal but I painted them black to protect against rust and improve appearance.
Anything I could fit in a toaster oven was baked at approximately 150 degrees Fahrenheit for two hours. Not sure of the exact temperature but you could touch the parts with only mild discomfort. The paint instructions said not to exceed 190 degrees.

Freshly repainted tool rest and banjo. The color darkens when dry.

Repainted bed. Same color as tool rest but the paint has dried for a few days, and shop lighting is less intense.
Better than a new dog. That logo pops!
Tail stock back together with nice new paint, looks better than 1974.

Next steps are reassembly and conversion to variable speed.