Sunday, November 30, 2014

Tote? Toat? Handle? That wooden thing on the back of a plane.

Why is the handle of a plane called a tote?

I got curious and found this 1883 reference in The Imperial dictionary, on the basis of Webster’s English dictionary, Volume 3; by John Ogilvie.

  • Toat: A joiner’s name for the handle of a plane.

Knight’s American mechanical dictionary, 1882.

  • The bottom of the stock is the sole. The toat is the handle.

Toat is an English variation of tote.

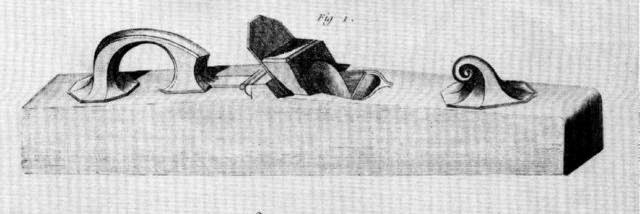
Joseph Moxon used the term “tote” and if you look at the illustrations in Mechanic Exercises (1678), the plane totes look like carrying handles.


Roubo’s planes also had carry handles.


So by my reckoning, they were called totes because they were used for toting around hand planes. I supposed that's equally true of today's planes although that wooden (or plastic) thing on the back looks more like a handle than a tote but who am I to argue with history. 
What do you think toats, totes, or handles?

Friday, November 28, 2014

Before and After Stanley 220 Block Plane

This block plane looked worse than it was. First degreased with a citrus based cleaner, rinsed, then de-rusted. The sole was flattened and the sides were sorta flattened. The blade appeared to be brand new under the rust and corrosion and still had the factory edge. It was fairly flat too. Will make a nice user plane. Most of the body Japanning is intact but the lever cap heel is bare.


After cleaning, before flattening.

Thursday, November 27, 2014

Before and After Cedarberg Mfg Co., Dandee Reel chalk line

This 1940's chalk line by Cedarberg was in bad condition. Three applications of Naval Jelly and a wire brush brought it back from rust-purgatory. It now works a dandy. 


Before


After


Tuesday, November 25, 2014

Woodwork Visualized: shop class in a book. [book review]

Woodwork Visualized by Ross Cramlet is a book of illustrations detailing everything you should have, could have, or did, learn about woodworking in your high school industrial arts program with a focus on hand tool woodworking.

[TLDR version: fledgling woodworkers should get a copy of this book or read it online for free.]


Ever wanted to predict which way a stick of lumber will warp? Curious why heartwood is more stable than sapwood? Cramlet crams much useful information about how trees grow, why and how lumber warps, how timber is cut into boards, how to measure board feet, and tips on selecting the strongest wood for handles (use fast grown, straight grain, wood); all in just four pages packed with pictures.


The bulk of the book is about tools and how to use them. Sounds stale because every woodworking 101 book has a section explaining that circular saws are saws that go in a circle. But you won't find power tools in Woodwork Visualized, it's about human power. The real difference is Cramlet teaches you how the tools are used as he introduces them. Some of the basics are very basic, like how to read a ruler. But there are plenty of wise nuggets like how to set your bevel square to 30, 45, or 60 degrees without a protractor. And much more like:

  • How to lay out common shapes with a compass. 
  • Transferring designs with graph paper. 
  • Setting up, tuning, and using hand planes.
  • Basic chisel cuts.
  • Filing. Rasping. Shaping. Sawing.
  • Several sections on wood joinery, marking, cutting, and fastening.
  • Sharpening. You know we woodworkers like to obsess about that.
  • And basic finishing.


There are a few projects at the end. Beginning with a simple box and working up to a saw bench, wall cabinet, workbench, tool box, and basic furniture. Projects may vary by edition.

I own the Second Edition ©1974. The online edition is ©1950. The Second Edition has 178 pages, 20 more than the online edition. There are minor differences in page order and projects shown. Pages above are from the 1950 edition.

Sunday, November 23, 2014

Variable speed lathe using a DC treadmill motor

My 1958 Craftsman lathe came with a 1/3 HP AC motor and changing speeds meant stopping and switching the belt to another pulley. Blech! A little research yielded a cheap solution -- a treadmill motor. Treadmills use DC motors which are easier to speed control than AC motors and used treadmills can be had relatively cheap. Components to the system are the DC motor, motor controller (PWM), potentiometer (pot), switch, fuse, and usually a choke (transformer).

Wiring is simple as seen in this schematic.


The motor controller converts AC power to DC, the choke smooths the power and gives the motor better performance. The potentiometer is an ordinary linear taper from Radio Shack. The most common controller is the MC-60. I believe all controllers are adjustable for high and low speed but I found no need, the default settings were fine.


Control panel that houses the controller, switch, and pot.
The switch plate is a bit garish but fun.

I designed a speed chart to go around the potentiometer. To see how I determined speeds, see my post on a shop made strobe tachometer.


Pictures of my DC motors and controllers.

1 HP DC motor
motor controller
Back of potentiometer 
MC-60 controller

1.5/2.5 HP DC motor
Your motor should come with a heavy flywheel to improve torque.

And on the lathes. First pic has messy wiring, later I made it tidy.


Same motor on my Goodell Pratt lathe.


Friday, November 21, 2014

An Improved Leg Vise: Kiefer meets farm vise

Update: new links, video fixed.

A clever fellow, Klaus Kiefer, saw my post on the angle brace leg vise and made incredible improvements. Kiefer ditched the two side brackets in favor of a large center brace and added a quick release. Kiefer's farm vise is simple to build from common materials.

Sketch Up Model
Leg Vise - Lumberjocks Page
Leg Vise Blog Post on LJ


Tuesday, November 18, 2014

Saturday, November 15, 2014

19th Century Dust Collection Systems

Many of us tend to think of removing wood dust and shavings as a relatively modern concern but the dangers of fine dust to the woodworker go back to at least the mid-1800's. Here are excerpts from an article in the 1873 book, On the arrangement, care, and operation of wood-working factories and machinery; forming a complete operator's handbook, by J. Richards.
Separator
The writer having been personally concerned in the introduction of this system in England and the continent of Europe, and having built pneumatic apparatus, that have been in constant operation since 1862, has no fears in recommending the system as practical and economical, apart from its convenience and its sanitary advantages in getting rid of the fine dust so prejudicial to health, and one of the most objectionable features of operating wood machines. 
The fans must be plain, strong machines, large enough to perform their work easily ; the vanes strong enough to break up sticks that may pass into the fan. The bearings should be outside the casing and pipes...
It is often desirable to have the fine dust separated from the shavings and sawdust; even if they are only to be used for fuel, and the magazine or shavings room should be arranged to allow the dust to pass off at the top, as in Fig. 22. 
I used to think my high school wood shop, built in the 1970's, was progressive for having an industrial size dust collection system but Richards discusses similar systems that existed 100 years before I was born. Initially I believed Richards was talking about just ventilating dust from the air but then he mentions floor sweeps and lines dedicated to machines.
Pneumatic Fan
Floor Sweep
...starting with 5 inches diameter for the smallest size for a main pipe, there should be added at least 10 inches of sectional area for each machine that is connected, except surfacing or dimension planing machines, which will need twice as much. 
Health risks from wood dust have been known for 150+ years and the means and will to remove that dust at least as long. So why do I feel like it has been 'rediscovered' as a new concern over the last several decades, at least by hobbyists? Leave your comments below.


Wednesday, November 12, 2014

Unusual Early 20th Century Leg Vise

[Updated 11/14/14 with new pictures]
While perusing Google Books I ran across an unusual leg vise arrangement on a Nicholson style bench in Farm Woodwork by Louis Michael Roehl, 1919. The leg vise has two angled braces rather than the usual pin bar. The angled braces, along with the screw, form a triangle that rides underneath the top keeping the chop parallel to the leg. As the vise attempts to rack, the downward force pushes the tail of the bracket into the benchtop keeping it level. The pictures explain better.


Friday, November 7, 2014

T-Shirt for vintage tool collectors

Printing is how I earn a buck and last year I made this shirt to wear during the Midwest Tool Collectors Association meeting in North Carolina. It's a two color print, red & white obviously. The front logo comes from an early 20th century Goodell Pratt advertisement. The back print was inspired by the brass badge on my GP model 125 bench lathe. The sleeve print will be familiar to GP fans, that's Mr. Punch promoting the company's automatic drill. I love the slogan, "1500 Good Tools." No company today would abide such an honest statement. While GP never necessarily made "fine" tools, they were heavy duty, and dependable. Eventually Goodell Pratt was gobbled up by Millers Falls but 85 years later they are still "good tools."


I have more vintage tool designs in the works.