Pages

Monday, April 28, 2014

Spinning tops on the lathe

Made from odd bits of scrap with a maple dowel through the center. Turned on my 1958 Craftsman lathe using a Nova chuck with pin jaws.

Walnut and maple.


Mahogany and maple. 


Solid maple with brass point. 


This one developed a crack while turning. 
I sealed it with cyanoacrylate (Super Glue).


Inverted top. 
The bottom is hollowed. Tricky to spin but works nicely.


Apologies for the poor video quality. My phone struggled with the lighting.


Thursday, April 24, 2014

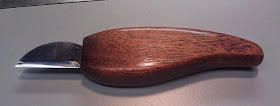
Shop made chip carving knife with mahogany handle


Using a french curve I drew this pattern on 1/4" hardboard. 
Cut out and sanded the edges smooth.


The blade is a Dewalt reciprocating saw blade. I removed the yellow paint and cut the shape with a Dremel and cut-off wheel. The funky shape is partly because I had cut a piece off for a marking knife and partly so it would be secure inside the mahogany handle.


I carved a mortise out for the blade and secured with epoxy. 
You can see the handle shape traced on the mahogany blanks.


Excess wood was removed with a combination of saws, chisels, and sanding machines.


Handle finish is blonde shellac then buffed with 0000 steel wool and wax.


Blade was polished to 2000 grit using automotive sandpaper. Edge was ground by hand then sharpened with a diamond file and sandpaper. 


Wednesday, April 16, 2014

Lathe turned cutting/marking gauge with sliding blade.

Cutting gauges are the same as marking gauges except they specifically have a blade instead of a pin for cutting across the grain and also can be used for slicing veneer. This one is made of African padauk and poplar. Padauk dust is very oily and tends to stain surrounding wood.


Normally a gauge has a bar that slides back and forth through the headstock like my walnut marking gauge at right.


Wanting to do something different, I turned a handle on the lathe which has a hole drilled through the middle then modified an Allen key by trimming the angled end and sharpening it. The metal blade slides in and out of the handle with a max cutting depth of about 2.5". A threaded insert goes through the fence and into the handle locking them together, a thumb screw locks the blade in place.


The blade is extremely sharp and this was one of the best marking gauges I've ever used, it went to my buddy Jordan on Lumberjocks. Someday I'll make another for myself.

Overall I was very happy with the design. One change I might make is not having a through tenon on the fence. And of course, prevent the padauk from bleeding everywhere should I use it again.


Viking Chest: Part 2, practicing wood hinges

Practicing wood hinges for the pine chest. If you look at picture 2, they are meant to hold the lid open slightly past vertical.


Tuesday, April 8, 2014

Viking Chest: Part 1, prototype in pine.

In 1936 a Swedish farmer's plow became tangled in the chain attached to a 1,000 year old Viking chest filled with metal and woodworking tools. The chest was built from oak with an iron lock and hinges. Since then, many folks have become fascinated with the Mastermyr chest and it's contents.

My version will also be oak but some pine boards found on the roadside will serve for a practice version.

Upside down close up of the bottom showing the bottom fitting into dadoes and grooves. The original Viking chest used dadoes on the ends and a rabbet down the sides.


The oak version will have angled sides but I just made straight sides on the pine chest. Here you can see the end pieces.


 The top is on the right.


A dry assembly test fit. Looks good to go.


Part 2 will be wood hinges, assembly and finishing.

Wood turning tip: Pattern Stick


The idea is nothing new, in carpentry and woodworking they are called story sticks and are simply a strip of wood with pencil or knife marks: a way of transferring measurements without a ruler. In wood turning they are called pattern sticks or sizing sticks and include a cut-out or silhouette of the piece.

Here is a very simple version for a socket chisel handle. Make your image on graph paper or computer, print and spray glue to 1/8" plywood, then cut away the notches. Hold the template against a roughed out turning blank and use a pencil to mark where each notch falls.


A slightly different version with half circles that can be drilled or cut out and used as a gauge.


A different socket chisel handle with more measurements.


How to Use:

The temptation is to grab a parting tool and buzz each line down to the dimension but first think about where to make your cuts because some will be directly on the line, some to the right or left. Deeper cuts should be made downhill of the line. If you straddle the line then your parting tool will cut into the wider diameter uphill side. Transitions like coves or beads should be cut directly on the line.

Here is how the turning blank would look on the lathe, overlaid with the template. Then cut off the corners and blend the curves to match your pattern.