Wednesday, April 29, 2015

Rockwell Delta 46-111 Lathe, Part 2: Paint

Indexing pin and tail stock levers that originally were bare metal but I painted them black to protect against rust and improve appearance.
Anything I could fit in a toaster oven was baked at approximately 150 degrees Fahrenheit for two hours. Not sure of the exact temperature but you could touch the parts with only mild discomfort. The paint instructions said not to exceed 190 degrees.

Freshly repainted tool rest and banjo. The color darkens when dry.

Repainted bed. Same color as tool rest but the paint has dried for a few days, and shop lighting is less intense.
Better than a new dog. That logo pops!
Tail stock back together with nice new paint, looks better than 1974.

Next steps are reassembly and conversion to variable speed.


Sunday, April 26, 2015

Goodell Pratt bench lathe, Part 4: reproduction knob

My first try at a reproducing the missing tool rest knob. I goofed and made the diameter a bit too small but otherwise it looks pretty good. I'll make another but this was good for getting for the dimensions and general shape. We'll call it proof of concept.


I started by gluing up scraps of maple and beech. Beech is on the outside right.


I always forget to take pictures but I measured the original with calipers, transferred that measurement to the wood blank using the same calipers and a parting tool, then blended the curves.


Before cutting to final size, I drilled a 3/8" hole through the center and installed a 1/4-20 threaded insert. I also marked off 12 equal divisions around the perimeter using the indexing wheel of my lathe then ground 12 grooves using a Dremel. I didn't bother sanding out the burn marks because this will be painted black eventually.


After friction polish (shellac/oil). Not shown here but I also seated the threaded insert a little deeper.


Comparison with original:


Friday, April 24, 2015

Rockwell Delta 46-111 Lathe, Part 1: Overview


Picked up a 1974 Rockwell Delta 46-111 wood lathe. This was a light duty lathe sold by Delta for over three decades, from the 50's - 80's. It is a "gap bed" lathe. The theory being you can turn a larger piece near the head stock but the gap is so short that it would only be useful for turning plates or platters. Besides a little surface rust, the lathe is in excellent condition and included the original 1/2 hp motor and sheet metal stand.


Specs:


  • 11"/14" swing
  • 36" between centers
  • 1"-8 spindle threads
  • #2 Morse tapers
  • 4 speeds (990, 1475, 2220, 3250)

In the late 60's or early 70's, Rockwell wanted to reduce cost so did away with the cast iron stand in favor of sheet metal which rattles like a meth head on a thunder machine if not braced and fastened to the floor. They also changed the tailstock from cast iron to cast aluminum. At least they upgraded it to a fast lever locking system instead needing a wrench.


The 46-111 indexing wheel has two rows. An inner row with 60 holes and an outer row with 8 holes. The manual includes a chart to tell you the #holes for common divisions.

Next step will be a good scrubbing, repainting, reassembly, then converting to variable speed.


Wednesday, April 22, 2015

Goodell Pratt bench lathe, Part 3 of restoration project

The GP is painted and back together. The bare metal is waxed only, not shined and polished, something that may or may not be done. The vermilion/paprika color defies my phone camera so these pics are not exactly the right shade.

I have more plans for this lathe which I will cover in a future blog. It won't be restoration exactly, more reproduction work. Also considering a video of taking this apart and showing the inner workings, not much to show but might be interesting to a few. Let me know if you would like to see that in a video. Might be a couple weeks before another update as I have finished painting another machine and need to reassemble it.


Best representative of the vermilion color.


Saturday, April 18, 2015

Goodell Pratt bench lathe, Part 2 - Painting

Vermilion Red

Goodell Pratt's trademark colors were black and vermilion red, which is an orange red. The closest I could find was Paprika by Rustoleum. It's not quite right but short of having a custom color mixed, it will do. And even if I wanted a custom color mixed, I have no perfect sample to match. The color on my lathe and grinder are not a perfect match, and I don't trust pictures on the internet. Speaking of pictures on the internet, if you Google "Rustoleum paprika", the color is more reddish. That's because I bought the wrong color. Someone had switched caps, putting a paprika lid on a can of orange paint and I didn't catch it until after I started spraying.


In the oven

UPDATE:

Went back to the store and bought the right color paint. Pic below.
Paprika


Here is [actual] Rustoleum Paprika. 
My GP grinder with factory paint.
Other GP color samples from the internet.
Colors are all over the place.


Black

This one is easy although a purist may dislike the semi-gloss finish since GP had a particular gloss level. I don't know what that gloss level was, but the internet is sure there was a specific one.


The Paint


I used Rustoleum Painter's Touch Ultra 2X. Supposed to be a paint and primer all in one that provides better coverage than their regular spray paint. Their Professional series covers the best if you ask me but this isn't bad.

Friday, April 17, 2015

Goodell Pratt bench lathe, Part 1 of restoration project

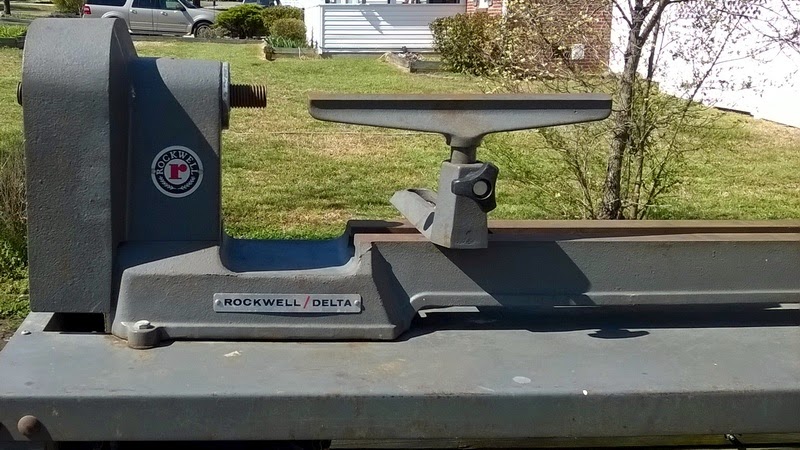
A little over two years ago I bought a model 125 GP bench lathe at auction for 2 1/2 sawbucks. It is missing the original tool rest and a few other accessories and had been painted a very Christmas-y green and red.

After a cleaning

The lathe is cast iron with milled ways. Like all things Goodell Pratt it is sturdy and built to last the ages. Model 494 was the bigger brother and was six inches longer between centers with the same swing. GP also sold a model 700 model/watch maker's lathe with a 5 inch swing and 3 1/2 inches between centers.

Model 125 Specs: 

  • Swing: 7 inches
  • 12 inches between centers
  • 1 Morse taper headstock with 1x12 threads
  • 0 Morse taper tailstock
  • Pulley diameters: 1 1/2, 2 1/2, 3 1/3 inches
  • Overall length 25 inches
  • Height 11 1/2 inches
  • Weight 30 pounds

Is/Was this a good beginner lathe?

I am a product of the late 20th Century, it is impossible for me to judge the 125 fully in the context of the early 20th Century when manufacturers were still experimenting. Nowadays, 1x8 headstock threads and 2MT are expected in lathes up to medium size. The 125 is a light duty hobbyist lathe but still the 0MT tailstock taper doesn't make sense. Two tapers means duplicate accessories and the 0MT is just dinky. A 1MT on both ends would have made accessories like the drill chuck more versatile.  The 7 inch swing limits use as a wood lathe and I suspect these were more commonly used as metal lathes for which they had a good variety of accessories. I found it difficult to power from a motor without considerable vibration. The height allows too much leverage if the motor is behind the lathe, and the base gets in the way if you try to mount a motor below. The design is really optimized for powering from a  large treadle flywheel or from an overhead line shaft. So as a modern day beginner lathe, it misses the mark by a mile. But in context of the late 19th - early 20th Centuries, none of these things were uncommon. Consider the Millers Falls treadle lathe with it's tiny 2 1/2 inch swing, 16 inches between centers and similar design. The popular Barnes No. 4 1/2 with you guessed it -- 4 1/2 inches of swing. Early Oliver treadle lathes had 8 inches of swing, now common 1x8 spindle threads, but non-standard tapers. Styling and design is pre-Art Deco which was about to sweep the world when Goodell Pratt was purchased by Millers Falls and stopped production of this lathe.

Another feature of early lathes was that of being a multipurpose machine. GP sold a nice array of accessories: A disc sander. An outboard buffing spindle. A fret saw. And a circular saw (table saw). Not to mention an impressive variety of metalworking accessories.

So while it may have limited usefulness as a modern lathe, the 125 and its' brothers exude charm and hearken to a time when design wasn't optimized for an assembly line or retail shelf space.

Some close ups.

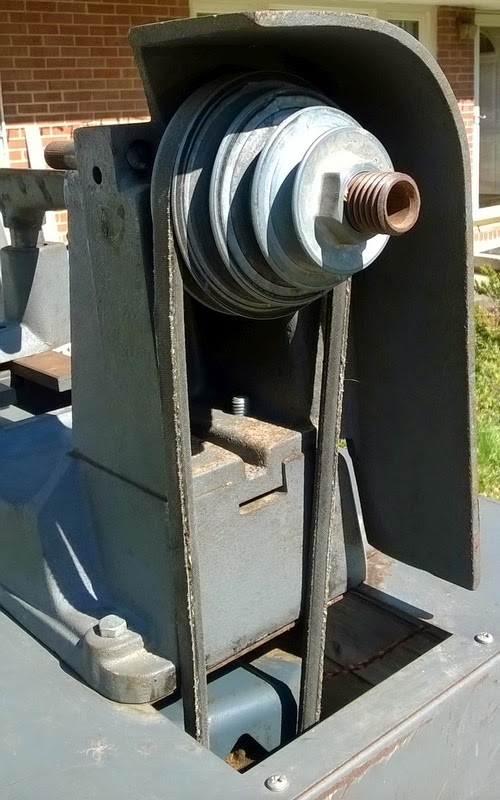
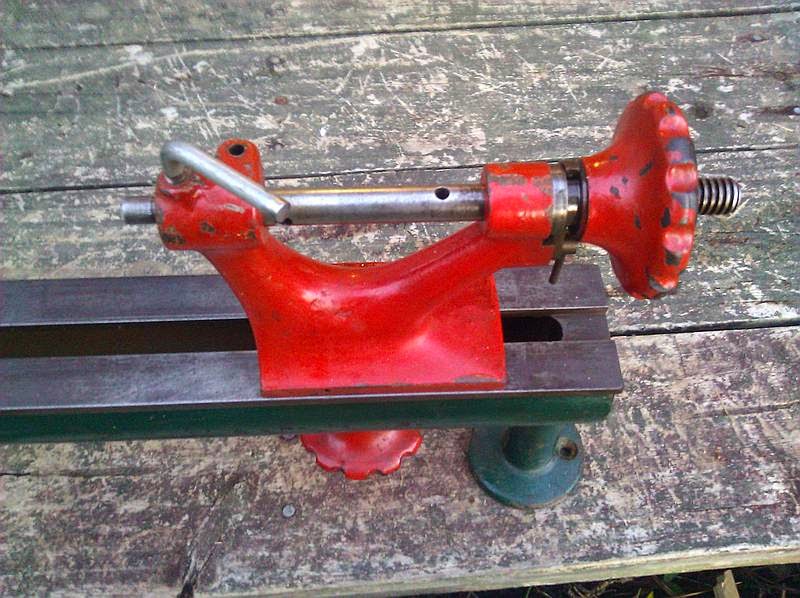
Headstock with three step pulley and oiling ports.  
The headstock uses a cone bearing to account for wear and has two oil ports. These are from a time before electricity was common in rural areas so there is three step pulley for the optional treadle base.

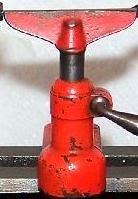
Tailstock. Missing fast action lever for drilling.
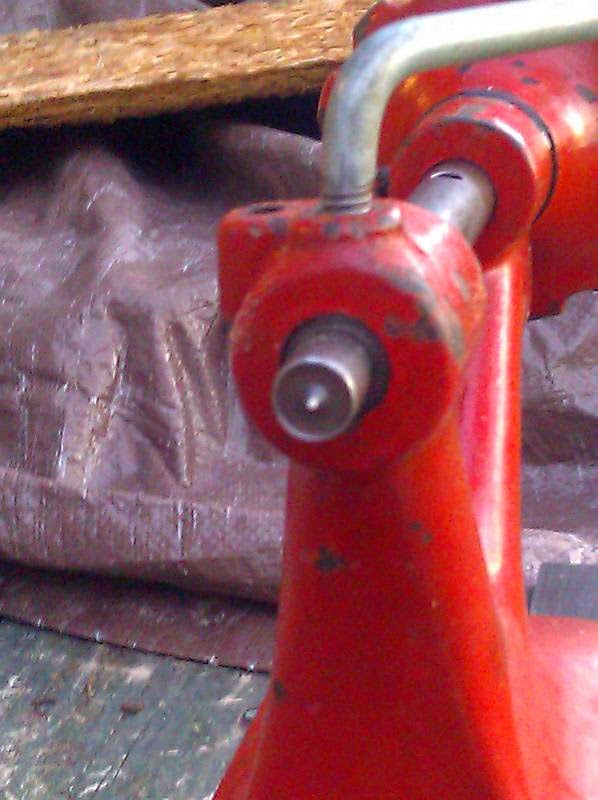
Tailstock business end sporting a cup center with it's tiny 0MT taper.
Stand built for the lathe

Part 2 will be repainting the no. 125. 


Thursday, April 16, 2015

Review: iGaging IP54 Digital Caliper

Sold by the same folks who sell the Accuremote digital inclinometer. I chose the IP54 after watching a thorough review on Youtube by Gadget Class. Inside the retail box was a decent plastic case that held the caliper, two batteries, the instructions, and a random piece of brown waxed paper (no idea why that was in there) but it was 0.004" thick. Both batteries were good. The plastic case that came with mine is slightly different than the picture on Amazon.

Of course I set out to measure all sorts of things that needed measuring like the scrap of brown paper in the case, various doodads and whizzbangs lying around. Precision was excellent. I tried measuring with the full length of the jaws then just the tips and each time the measurement was within 0.0005". Then I checked it against the only semi accurate things I own, drill bits. All my 1/4" drill bits were undersize and within 0.001" of each other, either 0.247" or 0.248". What does that mean? Nothing I suppose. I lack any set up blocks or anything made to a high degree of accuracy. Printer paper is supposed to be 0.004" and this agreed, that's the best I can do. My needs are modest, I'm not a machinist, so I'm sure these are plenty accurate for my purposes. The caliper itself felt well made, has good weight and no obvious defects. The thumb wheel moves freely. The display is large and numbers are easy to read under fluorescent lighting. Overall I am very happy with these. During the last few weeks I keep finding uses for this in my woodshop. It has become something I use on every project.

Monday, April 13, 2015

Review: AccuRemote Digital Inclinometer

From the outside in ... The packaging was attractive and consistent with other products sold by iGaging (makes no difference but shows the company takes some pride in their products). Inside the retail box was a sturdy white cardboard box that contained the inclinometer, a nice storage pouch, the instructions, a 9V battery, and a tiny screwdriver. I expected the AccuRemote to be made of plastic but it's actually a cast metal, possibly zinc, quite sturdy and heavier than expected. The battery compartment is accessed by removing four dinky Phillips screws that jump to the magnets as you pull them out, an unintended but welcome feature as they would be super easy to lose and very difficult to find. The dinky screws + battery cover are too 1970's for me, there are better ways to cover a battery but including the screwdriver was a nice touch.

The inclinometer was easy to use, I didn't bother with instructions. I spent awhile measuring angles everywhere then going around checking the machines in my shop. I tried testing for accuracy the same way you would test a level, by flipping it 180 degrees, but got inconsistent results. According to this, after setting my table saw blade with an engineer square, I was 0.20 of a degree out. So pretty close but if this thing is accurate then it's nice to get that extra precision especially when cutting miters or segments for turning. My miter saw was dead on perpendicular, as I believed. My band saw was off .5 degree which I already suspected.

It turned out, the case is not square to the bottom on all sides. So if you zero the device then turn it on it's side, it should read 90 degrees. The left side read 90 degrees, the right side read 89.70 degrees. Since I have a right tilt saw and would be using the bottom and right sides most often, being off by .30 degrees would just be annoying. I was also bothered that rotating the device 180 degrees does not give the same or reciprocal reading. And I had issues with precision (repeatability) when the daytime temperature was under 60 degrees Fahrenheit. So I sent the inclinometer back to Amazon. Based on the many reviews of this and similar products like the Wixey, I believe it is luck of the draw whether you get an instrument that is accurate and precise. So I wouldn't say iGaging makes poor instruments, just that digital inclinometers in this price range suffer poor quality control. The summary is I can not recommend for or against the product.